Friday, November 15, 2013

Progress on the Stern Deck removal

Managed to get a little work done in between hospital visits and other !@#$. Finished cutting the the port side deck off today. I decided to remove more of the rail cap so it would be out of the way while I figure out where the stairs go and how I am going to handle the transition from sun deck level to the existing rail level.

It is a slow and tedious job to get these bulwark caps off. They are screwed on every 9" and there is a sealant under them as well. The the holes where the screws are are filled with wooden plugs. So first you have to find the plugs and drill and dig them out. Next you have to clean the glue out of the slot (yeah slotted screws *&^%) in the hopes that the slot won't strip trying to back the screw out.

Here is a shot of the scarf joint showing one of the screws. There are two screws put in horizontally to hold the scarf together.


They are 2-1/2" wood screws. It only took about 1-1/2 hours to get them out and the cap off. Glad that is over. Oh yeah did I mention that the cap is slotted on the bottom to fit over the top of the bulwark.


And not a lot of room to work on this side. The starboard side was not as bad because the ramp is on that side. I am hoping to get a way without having to erect scaffolding on the port side.


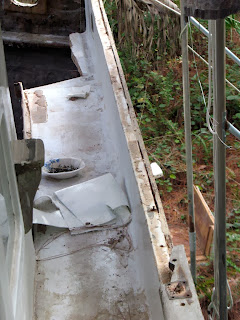
Cap rail off and ready to start cutting the side deck off.


Sorry did not take any pics while cutting the deck and inside of bulwark off. But here is the finished product.


the next step is to fasten a piece of 3/4" ply with Formica on one side. This will act as a mold to build up the hull to the sundeck level.


Here is the other side of the plywood showing the Formica.
So hopefully I will be able to add the "molds" for the other side and stern this coming week and begin glassing up the sides.


Sunday, November 3, 2013

Started Removing Aft Deck

Worked a few hours this afternoon removing the aft railings and teak cap rail in preparation for removing the aft decks.

Here you can see the railings and the teak cap rail are gone on the Starboard side and stern. Still have the cap rail to remove on the port side. I was thinking that they had glassed an angle into the hull at the top of the bulwark and another angle on the deck at the same height. Then they would over lap the two and screw and glue the joint together with 5200.


Well not quite, What they did was to just end the hull at the top of the bulwark then glass in a piece of 3/4" by 2" or so piece of wood. I have labeled the 3 pieces in this picture. The they did form an angle in the deck mold which they screwed to the wood they had glassed in. Not really strong but better for me. Most of the screws just pulled right through the glass work.


My plan is to remove the deck structure and the stringer they glassed in. Then I will taper the hull down near the top edge and temporarily attach a piece of Formica faced plywood to the outside of the hull. I can use this piece as a form to raise the top edge of the hull by adding more layers of glass that would lap the old glass and rise up to the new level. I think I will form an angle at that top edge to fasten the deck to. After building the deck/cabin top using cold molded plywood structure I can glass the top of the deck right down onto the new raised hull sides. Hopefully it will all make sense when you see the work in progress.


Did some more work in the front port area of the aft cabin too. I removed the sliding door into the salon and a silly little door from the aft cabin into the engine room. Great idea if you were an midget and the water lift muffler was not right in the way. I will splice in a piece of plywood to fill the hole left by the door into the engine room. This is also where I will be adding the bulkhead to extend the engine room space aft to the Stuffing box. I mentioned this in my last post. Again it will be clear when I have it done.

Well that's it for now. I have some outside work for tomorrow and Tuesday so I will not be back to work on this until Thursday.

Tuesday, October 29, 2013

Worked on something besides tanks


Finally got to work on something besides those bloody tanks. Started working on the new structure of the aft cabin. The new layout has the access to the stuffing box from the engine room rather than a little hole in the cabin sole.


So the first thing to do is cut the hole in the main bulkhead where the access will be. You can just see the heat exchange on the back of the main engine behind the plastic. You can also see a bit of the stuffing box at the bottom of the picture.

The builder did not use enough glass when tabbing this bulkhead in. It looks like it was just a layer or two of mat. I intend to beef that up in the places where the bulkhead is not removed.


Here is part of the accommodation plan showing the stuffing box which is just under the seat in the shower. I need to add the little bulkhead just above the "stuffing box" in the plan before I glass the port tank top on.


The bulkhead I am talking about is outlined in blue in this picture. You can see the forward access cover for the port side water tank. It will be under the bottom shelf of the linen closet. The blue line you see coming across the propeller shaft is the forward edge of the shower. You can see the stuffing box just under it. The will be about 12" of clearance over the top of the stuffing box.
So it is off to the plywood store to buy some 1/2" Dura-Ply plywood. I plan to laminate two pieces together to make the bulkhead. The little area you see at the bottom of the blue rectangle is the stringer side rising above the stringer elevation in the engine room. I want to extend this up to the top of the blue rectangle, so I am going to add a piece  that overlaps the stringer side and then another piece going up directly above it. You see....when I get it done


Here is the first side of the tank top I taped into the stringer. I used 3 layers of 24 oz Biax tape. I also mixed up some filler compound to create a fillet in the joint between the top and the side of the stringer. The white you see is the epoxy paint around the openings and a little extra I had left over.


Here is a closeup of the forward end of the tank. You can see a little more detail of the joint. I sure will be glad when this is done. It is kind of back breaking work on your knees. I cute the tape into 33" long pieces so I am only doing 33" at a time but it still keeps you moving.


In the day dream department I have been pondering the different ways to wire 3 and 4 way circuits to control the lights in the cabins. For instance it would be nice to have a switch at each entrance to the main cabin, so you could turn the lights on or off as you enter or leave without having to pass the same switch. Could turn into a real mass of wiring. Then I thought about using capacitive touch switches and a central controller. I found what I was looking for today. It is a controller for up to 8 circuits with 2.5 amps on each circuit, which should be plenty if we are using LED lighting. So if you do not need illuminated switches you would only need 1 wire to each "switch" location.

Capacitive Touch Sensor Switch - 8 Channels - 12V DC [XCTS-8M]

I was thinking of using bronze "coins" as the touch plates. Hey I gotta have something to think about besides fiberglass....


Monday, October 28, 2013

boat leveling......Easier said than done

When the truck delivered Phoenix to the house I could not get the driver to help me level the boat up. His trailer was set up with air jacks and hydraulic support arms. I figured it have been easy for him to set the aft end of the boat on blocks then raise the front to level the boat. He was not interested...

It will make the interior work much easier if the boat is level fore and aft as well as athwart ship.
No problem, just buy a 20 ton jack, jack the boat up and add blocking at the bow. Like I said, easier said than done. Buying the jack was the least painful part of the process. The boat keel was too low to to the ground for the jack to fit. After digging the hole for it I had to level the blocking so the jack would be vertical( it is best if the jack pushes the boat straight up not to one side). Turns out one layer of 2 X 8's would not do it. Ended up with 3 layers to finally get enough support for the jack and boat.
Next problem had to do with the top of the jack which is only about 1-1/2" in diameter. I did not try but I think that it would have just pushed a hole into the keel....Ended up adding a 1/4" thick steel plate then a piece of teak lumber. I was able to use pine blocking on top of that.  Maximum lift of the jack was about 6 inches, it seemed like 3 of those inches went to compressing the ground under the blocking and the blocking. It took several lifts to get it done, but it is done. The athwart ship level was a lot easier using the jack stands. All done now. Amazingly the waterline as shown by the water mark in the bottom paint agrees with the cabin sole.

I guess she was down by the bow originally which is why she had all that lead and concrete in the stern. I have added about 170 gallons of water which equals about 1400 pounds. I figure I took about 1610 pounds out, so I am still a little light. But we will be moving weight aft as well so it should all work out. I am not selling that lead until we launch the boat...

Salon floor is level, aft main bulkhead is only about 3/4" in 4' out of plumb...I guess they either did not have the mold leveled or they forgot to use a level when setting the bulkhead. Luckily it will not affect my work so it does not have to be redone.
Also managed to seal the tank tops in place with the ASI 502 silicone sealant. I wanted to let it cure for 24 hours before starting the glass work. Oh boy something to look forward to for tomorrow....

Sunday, October 27, 2013

The end is in sight...finally

Chad and I installed the finished tops for the lower tanks yesterday. Man those things are heavy.


Here are the tops for the 3 lower tanks complete with two coats of white FDA approved epoxy water tank coating. I am sure glad it is non-toxic when cured, is sure is nasty stuff when you are working with it...


Reverse or top side of same tops. I painted the tops where the covers seal with the same epoxy coating. Found these neat stud covers to keep the paint out of the treads.


Fast forward several hours of cutting silicone gasket  tape for the 4 sides of each opening, fitting and bolting the covers on.
Then we carried them up from the shop. You can see the upper center tank is still missing its cover.


So here is the last top with the stud bars glassed in. The glass wraps from the inside to the outside of the opening. I cut a piece of biax tape for each side of the opening. After fitting it over the studs I wet that side out then bolted the covers down. After turning the top over, I mixed up some filler material to go under the glass, then wet out the underside glass. Considering I have about 30 minutes before the resin starts to set up it is a hustle to get it all done. I am certainly glad this phase is over.


Same top with the two coats of epoxy on the underside. Tomorrow I will fit the silicone seals and access covers and it too will be done.

My plan is to seal the other tops in with an FDA approved silicone sealant this afternoon. Then I can start glassing them in tomorrow afternoon. With the silicone sealant in place the water in the tanks will only come into contact with either FDA approved epoxy or silicone.

Tuesday, October 22, 2013

Now we'er talkin

Making good progress on these bloody tank tops. I am actually working on the last one now. Need to buy more resin and glass to tab them in to the boat.


Work in progress. At this point I have cut the access ports, beveled the plywood on the underside and glassed the underside with 2 layers of biax cloth and layer of 1.5oz. mat.I beveled the plywood around the access ports so that there was no chance of water infiltrating the plywood core. There will be 12 holes drilled around the perimeter of each access port.


Another view of the underside after it is all cleaned up and ground ready to glue the stud plates in.


Here is the top side with the extra layers od mat added and ground ready to install the stud plates.
So Thursday I will finish this one and hopefully get it painted on the underside ready to install on Friday.

I think I will get the first coat on the other tops tomorrow afternoon so I can finish them Thursday ready to go in on Friday.

Tuesday, October 15, 2013

Progress on Tank Covers

Got back to work on the tank covers this week. It turns out that the access covers and ports are a lot more complicated than I thought. The next step is to make and install the stud plates to hold the studs which will hold the covers on.


I made the plates using 1/4" Aluminum plate. I drilled and tapped hole for the 1/4-20 Stainless Steel bolts. It turns out there are 144 bolts in all.
I threaded the bolts in with an impact driver and Lock Tight so they will not work loose when I am removing the covers.


Here you see two of the openings with the Stud Plates in place. I drilled the holes all the way though the top and the cover plate so hopefully the studs would line up with the holes in the covers. Easier said than done. I ended up having to clamp the covers in place then drill one set of holes, fit the studs in and bolt the cover on. Then I could remove the clamps and drill the holes for the other two plates. Then I could glue those two in place and bolt them up. The last step was the remove the first two plates and then glue them back in.


Here is one of the tops with all the studs in place.


The last step is to glass the stud plates in place so that the aluminum bars and studs are encased in glass on the underside of the top which will be inside of the tank. I used a single layer of 24oz, Biax tape which I cut so it could wrap from the underside up though the port and finish on the top side. I actually started by wetting the tape out on the tops side, then installed the cover again with a layer of wax paper in between, Then I flipped the top over and finished the glass work on the underside.


This is what the finished port looks like on the underside of the top. Everything is sealed in. The last step is to paint the underside with the Epoxy tank coating paint.


The finished port cover looks like this. It too will be painted with the white epoxy paint.
Onward, I only have 11 more .....


Friday, October 4, 2013

Progress on the Tank Access Ports

Spent the day glassing and grinding. I wanted to elevate the area of the top where the access covers seal to the top so that small amounts of liquids on the top would not flow into the tank when the cover is off . So I added two layers of 1.5ox mat around the port opening.


Here you can see one where I have add the 2 layers of mat around the opening. It elevates the opening by about 1/8" which is enough to keep liquids from flowing in......if the top is nearly level. I will be occupied with other issues at times when it is not level....like the boat sinking.


The other goal was to have the surface around the opening be as planar as possible to aid in sealing the covers. So I wetted to glass out then worked all the air out and laid a piece of wax paper over the wet glass. After working all the air out where the paper met the wet glass work, I layed a piece of 3/4 ply with Formica on the underside over the glass work and put 15lbs. of weight on it. It worked pretty well.


I used the pieces I cut out of the underside of the tops where the holes are located to make the covers. Unfortunately the glass work was not as thick as I wanted so I added 2 layers of 1.5 oz mat and a layer of 24 oz Biax to each one. The resulting thickness is close to 3/8" which should be plenty considering it will be held down with 10  1/4-20 bolts. The holes are only 8" X 10" in size. I marked the locations on the glass before I add the new layers. so they are permanent now.


Here is the stack of the 8 covers for the Port and starboard tanks. The P2 you see is glassed in, and means 2 hole aft on the port side tank.

I have the  2 holes in the upper center tank top left to cut and finish and to make the 4 covers for the center line tanks. This is going faster than the finishing of the insides of the tanks.

Tomorrow is tank trail fill day. I plan to fill all of them for a couple of days to make sure there are no leaks before I put the tops on....Also get to measure how much they hold.


Tuesday, October 1, 2013

On to the tops

OK so now I have to cut all the access holes in the tank tops, so we can get in to them to clean when needed. The tops had been cut and fitted to the tanks earlier so I thought I was almost done. Wrong again, it is turning out to be more work than I had hoped for. Some things never change...

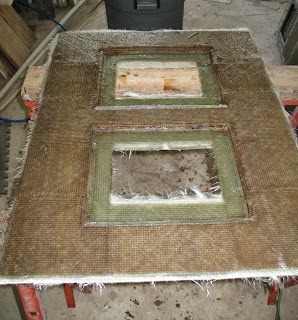
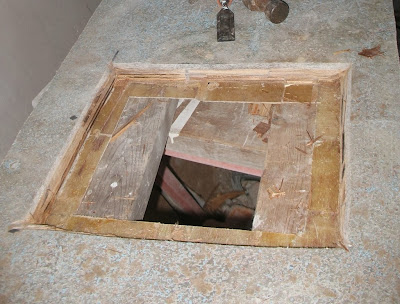
Here is one of the access holes as seen from the inside of the tank. The tops are cored with plywood, cutting a hole straight through the top would have exposed the core which is really not a great idea. So I have cut the hole larger on the underside and beveled the core down to the upper fiberglass skin. I plan to cut 1/4 thick aluminum bars and thread 1/4-20 stainless steel bolts into them. Then drill clearance holes in the upper skin for the bolts and glass the bars in from the underside. This would seal the bars, core and bolts on the inside of the tank. The access covers will just have clearance holes for the bolts and be held in place by nuts with fender washers. The aluminum bars are there to keep the 1/4-20 bolts from coming loose in the top. I figure that if I thread the bolts into the aluminum with locktite they will not work loose. Encasing in fiberglass is just an added precaution to avoid leaks.


Here is the view of the entire port side cover with the 4 holes cut. Had a little problem in that the builder only put a single layer of mat and roving on the underside of the core, not even close to the required amount. So I cut through the top skin in a couple of places which will have to be fixed. Oh boy more work....


Here is top side of the top at the same hole location as the first picture. I have added one layer of 24 oz combo mat over the remaining core as well as 2 layers of 24 oz. Biax tape around all 4 sides of the hole. Next step will be to trim the new glass work and install the aluminum bars and bolts. Then it will be ready to seal up with a layer of 24 oz. Biax tape wrapped from the underside up over the bars, though the hole and onto the tops side.  That should be easy... I am really looking forward to that mess.


Got smarter on the Starboard side top. I marked where the holes are on the top side and added the glass reinforcement before cutting the holes. Also added glass reinforcing to the rest of the areas where there was not enough thickness over the core. Port side top is now ready to cut the holes and bevel the core in preparation for the anchor bars.


One last shot showing the lower center tank top in place. I still have to finish it before it can be installed. But I wanted to see it in place. Looks like the access will be fine. Only catch is that the shower pan sits over the forward end of this tank. So I had the move the access port aft of the deepest part of the tank. I am planning to mount the suction tube and tank gauge in the cover. So I guess I shall have to plumb them with a 45 degree elbow so they will reach the bottom of the tank. But not today, gotta leave some work for tomorrow, and next week and next.....

Monday, September 30, 2013

Tank insides painted....Finally

Sorry for not posting on the sanding and filling and sanding and... well you get the picture. Well actually you didn't get any pictures because the tanks "looked" the same at the end of each day of sanding and filling and sanding so I did not bother to take any pictures. It was kind discouraging actually. But it's all done now.


Here is an overall shot of the 4 tanks all nice and brilliant white inside. The blue at the edges is blue painters tape to keep the epoxy paint off the fiberglass where I want to attach the tops with polyester resin and fiberglass. The epoxy adheres really well to the cured polyester resin, but the polyester resin will not adhere to the cured epoxy.
They look a lot bigger in white.  I calculate the forward center-line tank to hold about 115 gallons, it is almost 36"  deep at the forward end. Each side tank is about 135 gallons, and the upper center-line tank should hold about 100 gallons. Total tankage is 485 gallons, enough for a few days....depends who's showering.


Port side tank looking forward. You can see all the baffles with the newly cut holes to relieve the pressure on the baffles from the water sloshing forward and aft. The idea of the baffles is to slow the water down so it does not build up momentum like a wave does. This is only a problem when the tanks are not completely full.


Forward center tank looking aft. The finish really came out very smooth with no little recesses or crevices to trap dirt.
I found this Sherwin-Williams Macro-Poxy 646PW which is specially formulated for potable water tank linings. It is a 1 to 1 ratio 2-part mixture which uses Zylene as a thinner. Definitely a full respirator  and fans operation. Went on really well with a 6" x 1/4" nap slim roller and a brush for the corners. I put 2 coats on just to be sure. A small hand mirror worked well to see all the undersides of the baffle tops as well as down into the "pit" at the forward end of the lower center tank.


Upper center tank. This is the one that rises up through the cabin sole to just under the center-line bunk. There will be banks of drawers under the bunk on 3 sides. The rudder post and steering ram reside under the head of the bunk which is at the aft end of the cabin. You can see the "weep" holes at the bottom center and at each lower corner of the baffle. There is only 1 lift tube  per tank located at the lowest point in the tank. The weep holes allow all the water to drain from the other compartments of the tank to the lift tube.


OK last shot of the tanks. This is the starboard tank looking forward. This really is a big mile stone for me. I was beginning to think I would never get out of sander hell. But all the work seems to have paid off in a really smooth finish. Hopefully one that will last a long time. It will not be easy to remove the tops to redo this paint work.
My plan is to fill the tanks with water before putting the tops on permanently just to make sure there are no leaks.....

Now on to the access openings in the tops.

Tuesday, September 10, 2013

Fairing tank Interiors

Decided to fair ( smooth out) the interior tank surfaces. I believe it will make it much easier to keep the tanks clean . I could envision any dirt that got into the tank settling in to all those little depressions left by the cloth pattern.  At least the is what I keep telling myself while I am grinding pasting and sanding for....


Notice the lovely grey color. It makes a wonder fine dust when you grind it. Luckily it does not itch, so long as you do not grind or sand through to the fiberglass underneath. 


Close up of the forward end of the Starboard tank.
I am really only trying to fill in the cloth texture and small dips.

Not much else to say except grind on....

Hope to get the 2 side tanks done on Thursday. Tomorrow I go to mom's.

Tuesday, September 3, 2013

Continueing with the tank tops

Work proceeding on the center line tank tops. Only got a half day in today. I had to go buy more materials...


The first picture shows the 3 lower tops in place. Getting there.


I added an layer of biax material over the ledge at the front end of the port and starboard tanks. I also started the fairing work on the inside tank walls. All that grinding dust makes a very good filler for fairing. I just sift it through a 14 x14 window screen to remove all the big stuff. I want the insides of the tanks to be very smooth which will make it much easiner to keep them clean.


Here a shot of the upper and lower tank tops. The upper top is new plywood with the bottom side glassed.  The lower one is the lower center top with the glass work done on the top side.
Next step will be to cut and finish the access port holes. then I will fair both sides in prep for painting.


Another shot of the upper center tank top. Ready to trim the glass where it overhangs the ply.


Onward!!