Monday, August 4, 2014

Baffles Glassed in

It has been rough working conditions here lately. It is either too hot and humid (106 heat index) or raining cats and dogs. Without the tent over it I would be spending all my time bailing the boat out.

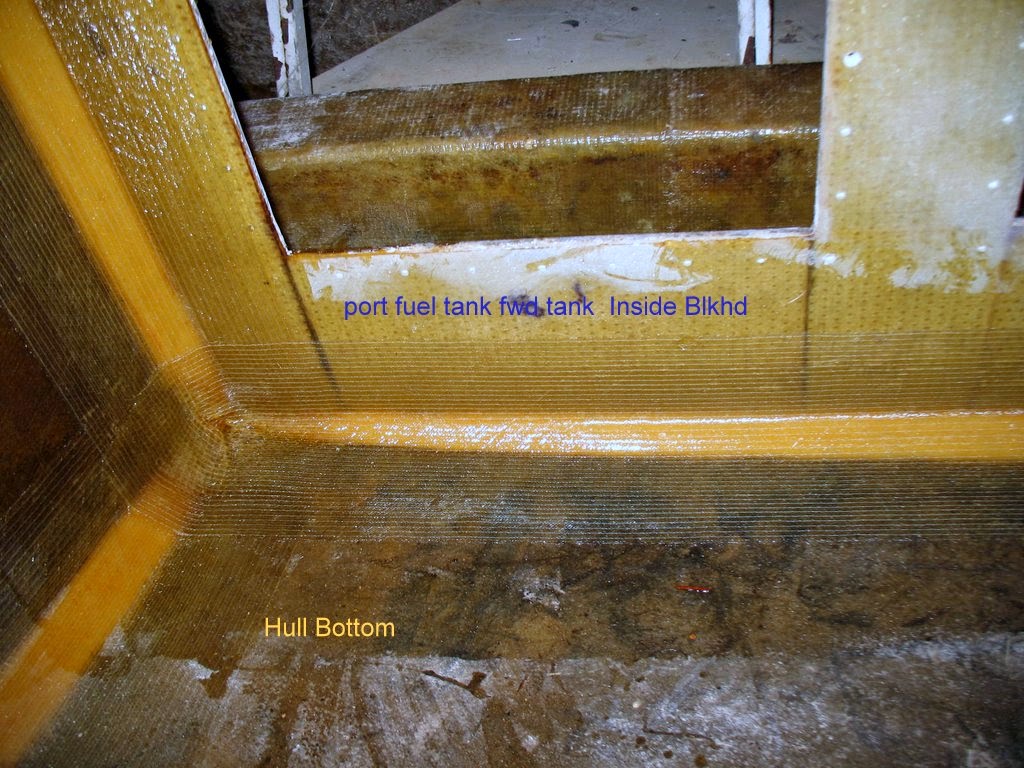
Here is the forward baffle glassed in on 3 sides. The tan color you see is polyurethane foam which I used to make the fillets for the glass work. Tomorrow I will grind the edges smooth on each piece. The next step will be to build the flange at the top where it meets the tank top. right above the lettering in the picture.The blue and white you see on the baffle is leftover gel coat, I made the baffles out of glass I salvaged from another boat I cut up. No sense in throwing good solid fiberglass panels away.


Here is a closeup of one of the joints. I am having some trouble with the new resin draining out of the vertical glass work before it sets up. You can see a few light spots near the top of the glass.


This joint was done with the Vinyl-ester resin and I had no problems with it draining out. The old resin I was buying in the 5 gal. bucket did not give me any trouble either. So I think I am going to pick another 5 gallons up to finish this work. It is more expensive but a lot easier to work with. I still have lots of glass work to do that is horizontal, where I can use the new resin.

Tuesday, July 29, 2014

Back to work

Had a nice vacation in the woods of the Blue Ridge mountains. Got a little zip lining in, a rafting trip and some tubing on the smaller rivers. Took a week after returning to get back to work on the boat.
Anyway here we go.


Last Friday I put the form work together to lay up the flanges to support the top. The underside of the white pieces are high gloss formica so the glass work will not stick to it. the four pieces you see hanging down are to clamp it to the tank sides while I do the glass work. You can see two of the clamps on the left two pieces.


Today I was able to glass all the flanges in. It took about 2 hours of pretty intense work for each of the two tank sections. I always try to glass the four sides in in one session to they bond to together better. As you can see in this photo not all the corners are covered completely. A little grinding and then I will be able to close those little spots up. Tomorrow...hopefully


Then this afternoon I started on the two baffle plates. These are cut from reclaimed fiber glass panels. No sense in throwing away good solid fiberglass only to lay up more.
So I got them rough fitted and ground the back side down to clean solid glass. The other side is gel coat which I will grind the surface of in most and all of it off where I have to glass it in to the boat.

Feels good to be making progress again.

Wednesday, July 2, 2014

Back to Work

Seems like I have been busy doing everything but work on the boat the first part of this week. But I back at it with some help from Chad. I cut and spliced the top for the port side fuel tank. Then we glassed both sides of it.

We layed up 1 layer of 24 Oz. Combomat, 1 layer of 1.5 Oz. mat and 1 layer of 8 Oz. Cloth. I did it that way so that the finished surface would be smoother and require less filling and sanding to get a smooth surface. I am very pleased with the results.


Here is a shot of the seal on the plywood which I used for the core of the top. You can see it quite clearly though the 3 layers of glass. That is the mark of good glass work.


After sanding all the edges of the taping I did in the interior of the tank I got to work on the preparations for glassing the top on.
My plan is to glass a lip onto the top of the bulkheads and the hull side which the top can rest on. When ready to put the top on I will wet out 2 layers of 1.5Oz. Mat on top of the lip all around then put the top on and press it down onto the wet glass. Then it will be glassed on the outside like the starboard tank was.


This is a shot of the underside of the form for the lip.
The main advantage of this method is that it is a lot easier to complete the inside of the tank and make sure the access covers seal well with the top off. On the starboard tank I put the inside bulkhead on last, thinking that I could glass every joint inside and out that way. I was able to reach the inside corners of the inside bulkhead though the access ports. But it was a real nightmare and then I had trouble getting the inside surface around the access port even so the covers would seal.
So this time the top goes on last.


Tuesday, June 24, 2014

Inside Bulkhead glassed in place

No much progress today. Only got a couple of hours in before having to go to town for supplies.
I did get all the joints between the 3 bulkheads and the long interior bulkhead glassed in on the inside.

I thought I had taken a shot of the whole thing, but no.....So you will have to put up with a couple boring shots of glass work.


So next step is to glass the outside bottom joint where the inside bulkhead meets the hull bottom on the outside of the tank. The foam is already in place and will get pretty beat up if I don't glass it.
Then I will fit the access covers to the bulkhead. Then it on to the flange to hold the top on.That should take us near the end of the week. I have to take a day off tomorrow to do some other work.

Monday, June 23, 2014

Progress on the Port Fuel Tank

Made good progress on the inside bulkhead for the port side fuel tanks. Started the morning grinding the rough spots off then released it from the Formica and cleaned all the edges up. I was very pleased at easily it came free from the Formica I had layed it up on.

The bottom surface which will be the inside turned out very smooth.Here it is with the inspection port covers in place. After lining the covers up where I wanted them I drilled 1 hole though the fiberglass at opposite corners. Then I threaded those two holes in the aluminum and put the studs in. Returning to the bulkhead opening I inserted the two studs in the holes I had drilled to hold the plate in exact alignment. Then I drilled all the rest of the holes though the fiberglass.


There are 30 holes in each plate. The method I use to align those holes makes sure that they are all lined up right. The first holes I drilled though the plate are smaller than the bolt diameter. I enlarge the first two corner holes to 1/4" so the studs will fit though tight thus holding the plate very steady while the rest of the holes are drilled. The final size for the holes in the fiberglass is 5/16" there is not very much room for error. if the plate were to move even a little while you were drilling those holes it would not fit when you have all the studs in. Been there done that....
After drilling all the holes though the bulkhead, I cut and glued the gaskets on to the plates. Then I threaded all the holes in the plates ready to bond the studs in. The cordless drill comes in very handy when threading all those 120 holes in 4 plates.


So here is the inside bulkhead in place with all the foam strips in ready to glass. I am putting the top on this tank last. On the Starboard tank I put the inside bulkhead on last, thinking I could get better bonds on the top with the inside bulkhead off. But fiberglassing the top on from inside the tank and then having to glass the bulkhead on though the inspection ports was a real nightmare. I got it done with good joints all around but swore I would never do that again. I have a better plan, which you will read about as I proceed.


  One of the inside corners with the polyurethane foam fillet in place. I found these a whole lot easier to make than the resin and saw dust ones are. The strength is in the fiberglass not the fillet.

Hope to get the inside corners all glassed in tomorrow.

Friday, June 20, 2014

Inside Bullkhead of Port Fuel Tank

Chad and I were able to layup the inside bulkhead of the port fuel tank this morning in 2-1/2 hours,
record time. It sure was a lot faster and easier with his help. This finished product came out much flatter than the first one did. I had trouble getting the joints in the glass work to layout flat before the resin kicked. There was just too much glass to work to get it done in time. Went much better today with his help. I had him wetting out the glass while I worked the air out off it and laid more pieces in.


My ideas for the mold worked out well too. This is the bulkhead with the sides of the mold removed. The glass came away from the masking tape OK and the tape came off the wood easily as well, so there was a backup for when the glass stuck to the tape.
The Dark areas you see are the joints in the top layer of glass. The layers overlap where the vertical sections meet the bottom and top cords. There are 4 laminates of 24 oz Combomat and 1 layer of core mat in the middle. Really a bit of overkill considering that each section will be glassed to either the hull, one of the other sides of the tank or a baffle which goes in the middle of each tank. But I wanted the thickness to get some stiffness around the edges of the inspection ports so the gaskets will seal.

I finished glassing the forward and  middle bulkheads in as well. So I am ready to glass the inside bulkhead in when I have it ready. My next step will be to clean it up around the opening then drill all the holes for the bolts to hold the covers in. With any luck I should have the inside bulkhead glassed in by the end of next week.

Thursday, June 19, 2014

Moving Right Along

Making good progress on the port fuel tank. I can not get over how much easier it is to work without the Cabin sole in. Trying to save myself the work of removing was a mistake. Just hope putting it back in does not prove to be a complete pain in the ass.


The forward Bulkhead clamped in place ready to glass. It takes a while to get everything lined up right. I thought I had the foam in line but it turns out that it is very hard to get the foam in so that the bulkhead lands on it completely. I ended up unsticking it in a few places to move it to get it right.
So that is glassed in on the after face of it. I won't bore you with more pictures of the glass work. They have been added to my collection for posterity.


Next came the dividing bulkhead which you see here in place and glassed in on the after side of it.

The aft Bulkhead went in first and it has been glassed to the hull on both faces. I still need to glass the forward faces of the dividing and forward bulkheads. Maybe I will get to it tomorrow after I finish laminating the interior wall up.


I re-assembled the mold for the interior wall of the tank. I replaced the wax paper release idea with waxed high gloss Formica. I am hoping that it will give me a  smoother surface. The wax paper seems to wrinkle regardless of how careful you are. We will know tomorrow....


It took several hours to cut all the pieces of fiberglass to laminate it up. The big openings in the middle make it difficult to build without a lot of waste. I ended up cutting pieces to fit in around the openings.
There are 4 layers of 24 oz. Combomat and 1 layer of Coremat for a total finished thickness of 7/16". There are something like 57 separate pieces of glass and Coremat.
It should take 2 to 3 hours to laminate the whole thing up.


Finished to afternoon up by drilling all the holes on the cover plates...all 96 of them. So they are ready for the next step which will be to use them to bore the holes in the wall around the openings.
Then I will thread all the holes in the plates and install the 1/4-20 bolts.

Have sailboat racing both days this weekend and doctors Monday morning. So not much progress on Monday.