Saturday, May 17, 2014

Getting ready to build portside tank

Spent yesterday on the demo of the tank supports, cleaning and grinding. The grinding is the best part, lots and lots of fiberglass dust. Nice itchy fiberglass dust.


Started the day with the area looking like this....


Fist step was to vacuum out the 30 years of dirt and rust. Next up was to tear out the tank supports. You can tell where they were attached by the light colored spots where they were taped in. It was easy to remove these due to the fact that they were so lightly attached to the hull. And only in 2 spots per support, you can just see the stripes where the supports were. I guess the builder figured the tanks were so heavy they would hold the supports in?????


Here is one of the pieces of glass work I ripped out. It looks like maybe 2 layers of 1.5 Oz. Mat.

They did not adhere to the teak? framing members at all and came of the hull very easily.
Fiberglass will not adhere to teak due to the oil in the wood...


I had reinforced the tank attachment at the aft end of the tank before the starboard tank decided to leak. You can see where I ripped the their glass work off. Notice that it stops where I added the new glass work. Had to cut that part them grind it down...again.


This is what 2 hours of grinding will get you.
Notice the dark spots. The final glass work was very uneven, the dark spots are the low spots which I will rough up and fill to get a more even surface for the inside of the tank.
It just keeps getting better and better...at least I do not have to crawl around in a cramped space to work on this one.

Thursday, May 15, 2014

Out with the old...


Finished up cutting the old port side fuel tank up today. Here it is in the yard next to the boat. The orange-redish color is the outside and the blackish is the inside. Got a lot of practice with the cutting torch cutting the tank into pieces I could carry out the door by myself.Stuff is heavy.
The bottom of this tank actually was not as bad as the Starboard side tank was. But I did find several spots where the steel was very deeply pitted. So out it goes. I could not imagine having to do this job after we have the whole boat rebuilt and are living on her.


Here is a shot of where the tank use to be. Notice the big hunks of rust that were on the back side of the tank, where you would never be able to get to to paint or clean. But you bet the water can get there!!!

So tomorrow I get to clean the hull up, rip out the old support that are left and get ready to build the new tank. I am hoping this one will go a lot faster with better access and the experience of the Starboard tank.

Saturday, May 10, 2014

Final testing and Filling of Starboard tanks

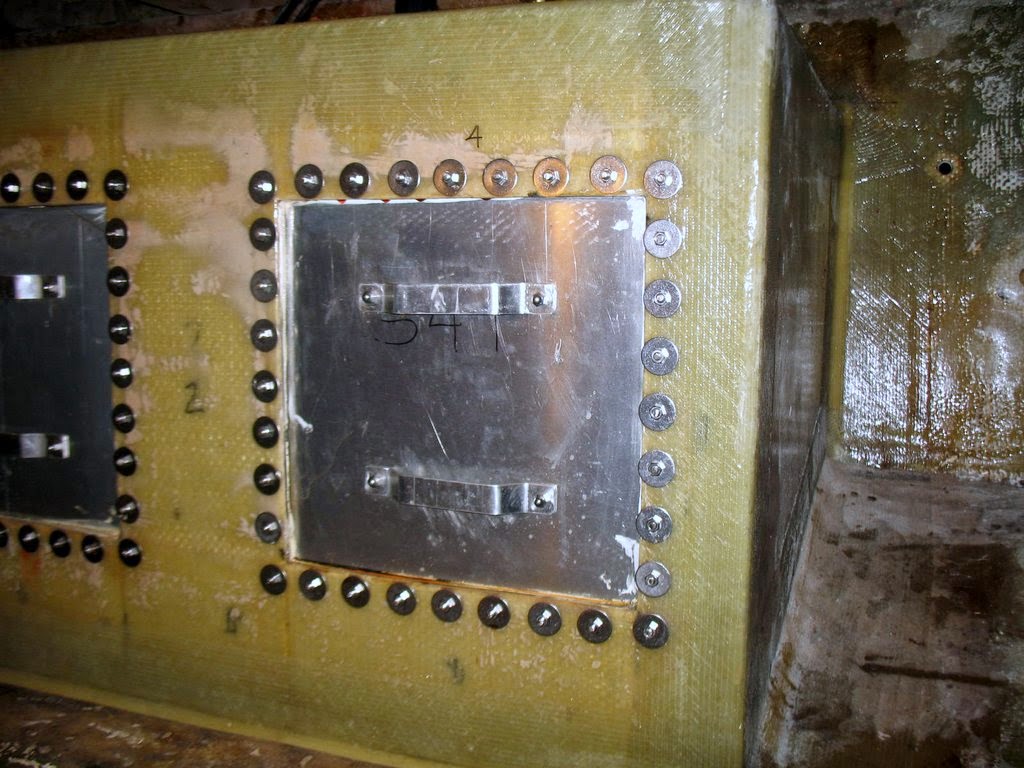
 Finally finished the starboard side tanks. I had some issues with getting the bulkhead fittings and the inspection ports to seal. But I found a thread sealant that did the trick. I also ended up making a tool that I could use to pressure test the tanks. The problem is that you only want to test them with 3 PSI of pressure and finding a gauge that is accurate at that range is hard. Car tires normally have 32 PSI in them. So here is the near final product.


I still need to add the acorn nuts on all the cover bolts and build the walls up to the underside of the

salon floor. That will create storage spaces on top of the tanks that are accessed though hatches in the salon floor.

This one of the access covers.

I have started on the port tank removal. I cut a hole in the top to start cleaning it out.

that is what the bottom looked like when I opened it up. I will take some more shots tomorrow to show you that the crud is about 1 inch deep!!!

Sunday, April 27, 2014

final glassing of Starboard tnk edges

This post is out of order, should be ahead of the last post. However I forgot to do it first.

I finished glassing all the remaining outside corners of the tank. Here is the aft top corner.


And the inside top corner


And the front top comer and front end of top to hull joint...


More of the top to hull joint.


And finally the front side corner. I have taken pictures of every corner I glassed to keep a record of the original work and how the glassing looked. Just in case there are any questions in the future about the construction.

Makes for kind of kind of a boring post...

Trying to finish starboard tank

It seems that the two hardest parts of a project are the starting and completing. I only had two items left on the starboard tank 1. fix the unevenness around the inspection ports  and 2 install the deck fills. It has been 2 days!!! and I still am not done.


The idea was that I would mix up some resin with filler apply a layer around the edge of the opening where the inspection panel seal to the wall then clamp this panel on to make the surface very smooth and even. The panel is faced with high gloss Formica which the cured resin will not stick to. 
Well it worked better in theory than practice, the issue is getting enough filled resin on to fill all the voids, which were larger than I had expected. I also discovered that you have to add a lot more catalyst to resin which will have filler added to it. It is best to add the catalyst before the filler to make sure you get it well mixed.


 Onward! To the deck fills. It took some time to determine where to place the deck fills so they would interfere the  least with the storage under the side decks and on top of the tanks. Here is the under side of one of the deck fills. The little chain attaches the screw out cover to the fitting so it will not walk away while you are filling the tank as they are want to due....

Here are the fittings I bought for the tank end of the fill hose. They are though hull fittings which may be a little overkill for this application, but I did not want any fuel leaks...
I used some of my glass filled resin to bed the fitting inside the tank. Once that has set I will loosen the nut and fill the hole around the fitting with resin just in case it try's to leak. That way the plywood core is sealed.


Here is the after tank fill. Tomorrow I hope to get the access port covers in and fill the tanks with water to test them. I would like to get on to the port side tank.

Friday, April 25, 2014

Ripped the sole out!!!

I decided to make life easier for myself on replacing the port side fuel tank.


We ripped the entire cabin sole on the port side of the main salon out and removed the 3 center beams. As you can see this greatly enhances access to the port fuel tank.
I did not do this on the Starboard side because I did not think it would take that long to build the tank......Boy was I wrong about that!!!

Interesting note regarding the "post" on the cabin side. You would think that they would land on a beam for support. Not in this boat, they were just sitting on top of the floor.

Anyway I am ready to start on the port tank next week.

Tuesday, April 22, 2014

Progress on Starboard Fuel Tank

Being sick with a bad chest cold really slows things down.  Finally got back to work yesterday after two weeks fighting it. I was able to work on the design for the fuel managment system and fresh water system. I will leave those for another post.


I was able to glass the bottom edge of the tank side in and put 2 coat of vinylester resin over the glass work on the inside of the side wall. I had to sand it today AGAIN and will have to put one more coat on tomorrow. I also have to glass in the outside of the top to hull joint and the other 3 outside edges of the side wall. Last job of the day was to get all those edges ground and prepped for glassing tomorrow or the next day. Have help coming tomorrow so I think we will concentrate on removing the salon floor on the port side which will make the removing and replacing the port side tank a lot easier.

Here are the fuel accesses for the aft tank. There are 3 fittings with valves and 1 (behind) for the vent which needs no valve. The other 3 do need valves due to the fact that the piping will run to filters and fittings that are below the level of the tank and could cause a siphon leak. The fitting at the rear is covered with black tape to keep dust out.


View of the lift tubes extending into the tank. The one on the right is the draw for the fuel polishing system. It will draw fuel and dirt from the lowest point in the tank. I have set it right to the bottom so that any water or dirt will be picked up right away.
The one in the middle is the draw for the engine and generator. It extends down to about an 1-1/2" off the bottom, low enough to nearly completely drain the tank but not low enough to pick up water. That's the idea anyway.....
The last one is the fuel return from the engines and it is bent to direct the returning fuel away from the fuel draw. The returning fuel is hot and if you recirculate that hot fuel it will only get hotter to the point of creating a problem. This way the returning fule is mixed into the existing fuel.


I had made and attached the handles to the inspection port covers before I got sick. The covers are mounted from the inside of the tank so the handles are needed.